Today I’m going to talk about setting up a 2 node vSAN witness homelab. Homelabs are important for anyone wanting to progress their knowledge, although some hardware can be quite expensive, especially if you want to work with multiple hosts! Nested environments are quite popular but I think nothing beats having physical hardware to play with and cable up. I have a third host arriving soon so I thought I would take the opportunity to cover a 2 node setup before I migrate. I will cover the homelab equipment in more detail in another post, today is just the installation of the two hosts, vCenter, network configuration, vSAN witness appliance & setup.
The hosts I am using are SuperMicro SYS E200-8D. They are small, have a 6 core Xeon processor, take up to 128GB of ECC RAM (or 64GB non ECC), feature two 10Gb NICs as well as another two 1Gb NICs , plus IPMI which allows remote console access. The vSAN witness appliance will be installed on an old Intel NUC I had laying around from previous Plex duties.
I’m going to directly cable the two hosts together and use that for vMotion and vSan. The other 10Gb NIC will be used for VM port groups and management.
I’m not going to go through the ESXi or vCenter install process itself, as I think that has been covered many times on the web, so I will skip that apart from bootstrapping vSAN. What I will mention quickly is my home network setup. All of my regular devices, such as my PC, TV, phones etc run on the native VLAN. As I wanted my VMware lab separate, I have it running on VLAN 2. The switch ports which are connected to the vmnic’s I am using for Management and VM traffic are trunking, so I need ensure I correctly tag both the Management Port Group (PG) as well as the default VM Network PG that is created with VLAN 2. Something to bear in mind depending on your setup as you may find that you cannot access the host or later on the vCenter server.
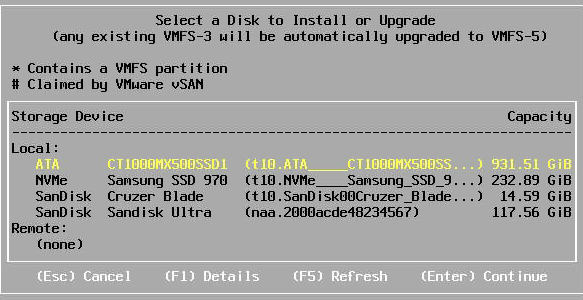
Below you can see the HDDs which I have in my host. There’s a Samsung 250 GB nvme SSD which is going to be used for caching, a Crucial 1TB SSD for capacity, the 128GB USB installer media and a 16GB USB drive for the ESXi install destination.
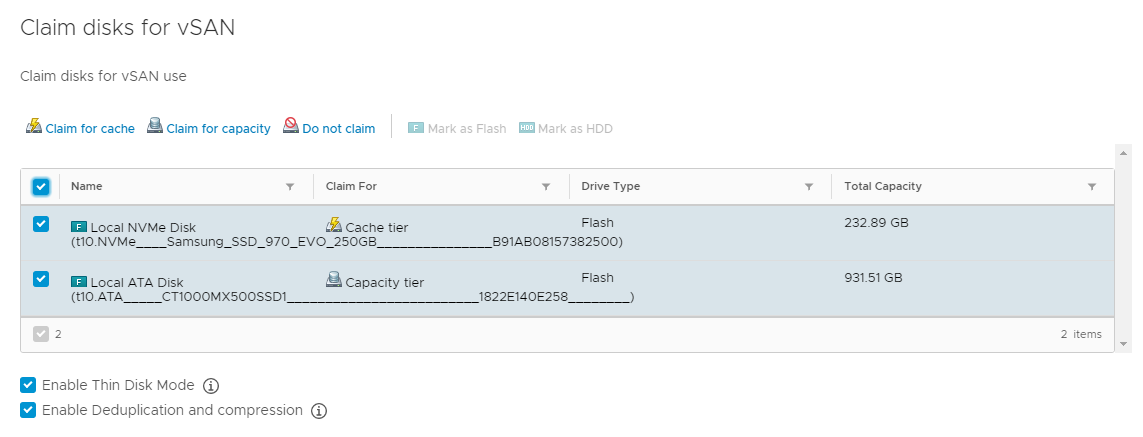
Once you have installed ESXi, log in and ensure you tag your port groups appropriately. Then proceed to installing the vCenter Appliance. During the vCenter install process, select the option for bootstrapping VSAN and choose the disks for caching and capacity as shown below, then continue. The vCSA installer will create a new vSAN Datastore called vsanDatastore.
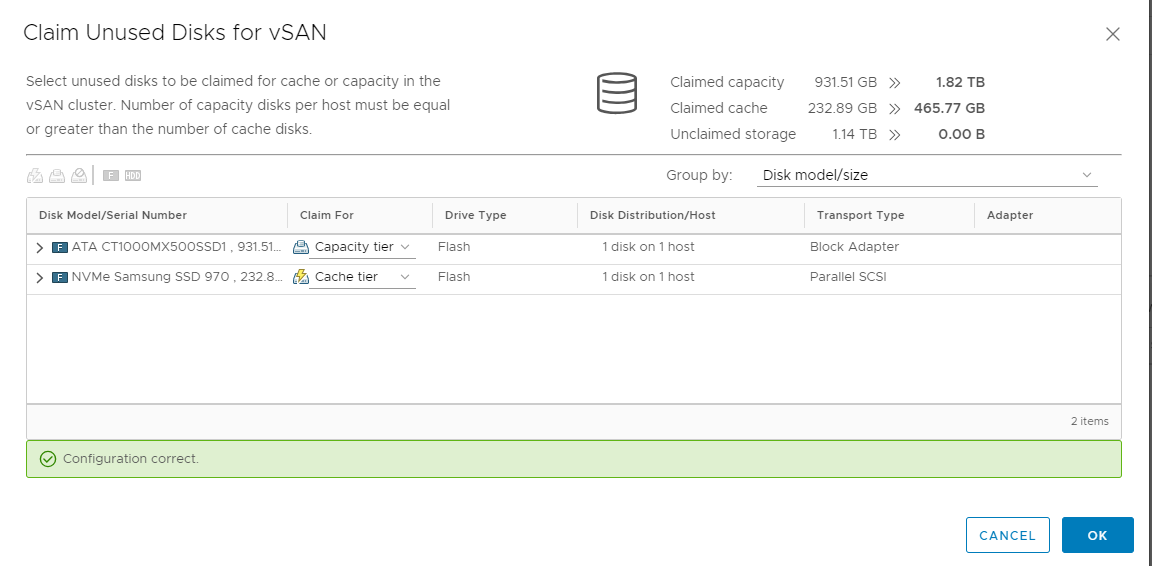
After the vCenter Appliance has installed, log in and then add the second host to the newly created vSAN cluster. If you added the host using 6.7U1 the host will be in maintenance mode, so exit that first. We need to add the second hosts disks to the vSAN cluster. Head to Cluster, Configure and then Disk Management, select the new host and click on Claim Unused Disks for vSAN.
After adding the disks to the vSAN cluster, it will start alarming. This is because the networking has not been set up so the vSAN data cannot replicate. There will other alarms, right now they are not a concern as we have not finished setting up the cluster yet.
I mentioned above about having a directly attached cable between the two hosts which will be used for vSAN and vMotion traffix. To do this we need to set up a vSwitch, vmk and also enable jumbo frames (9000 MTU). Head to the first host, Configure and under Networking select Virtual switches. Now select Add networking. We are going to create a VMkernel Network Adaptor and also create a new vSwitch. During this process add the directly connected cable to this new vSwitch.
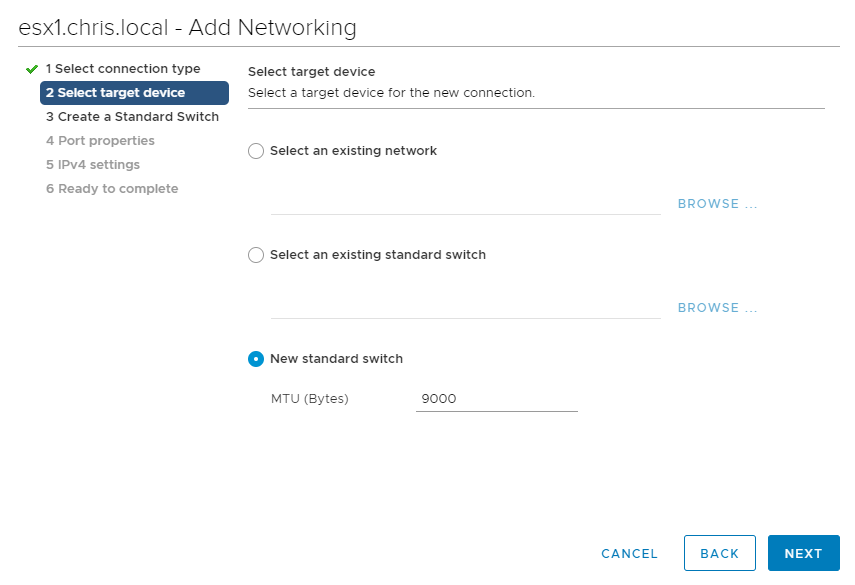
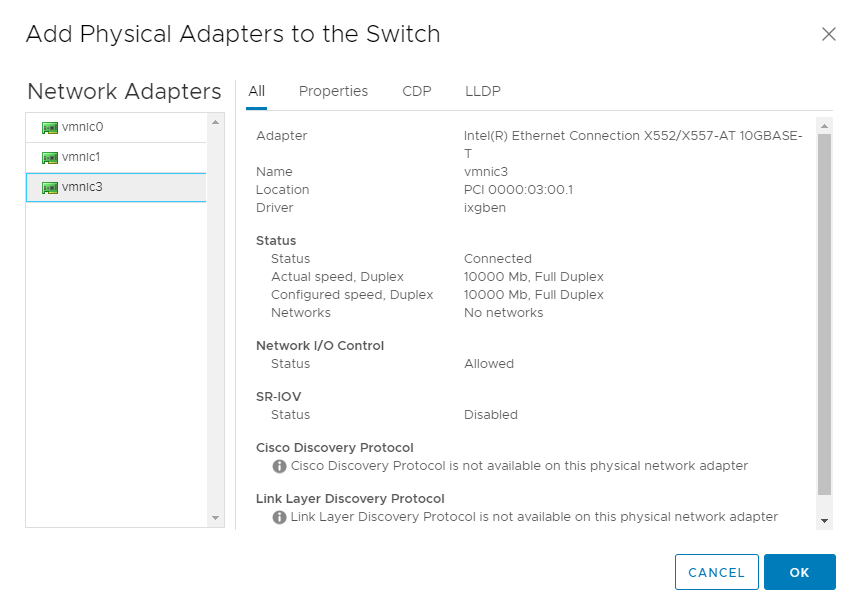
Select the appropriate vmnic, in this case it’s vmnic3 which is my directly attached NIC.
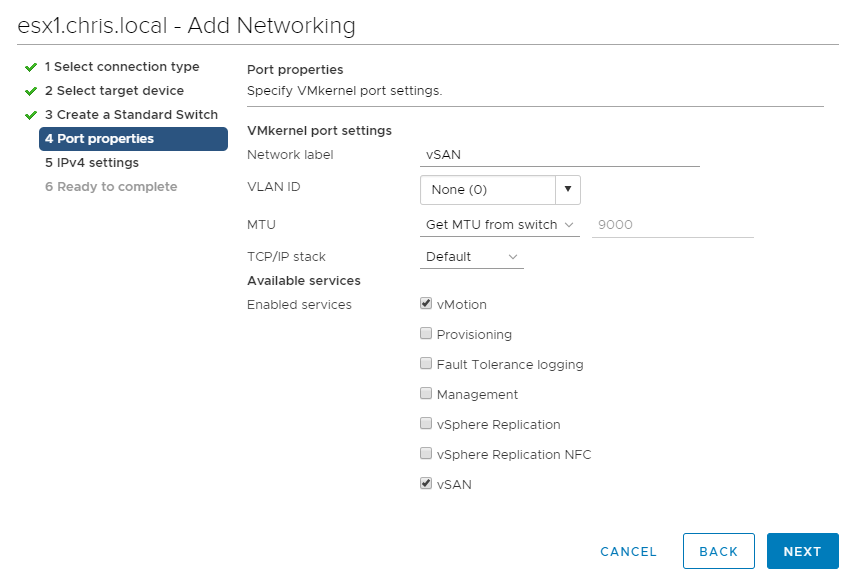
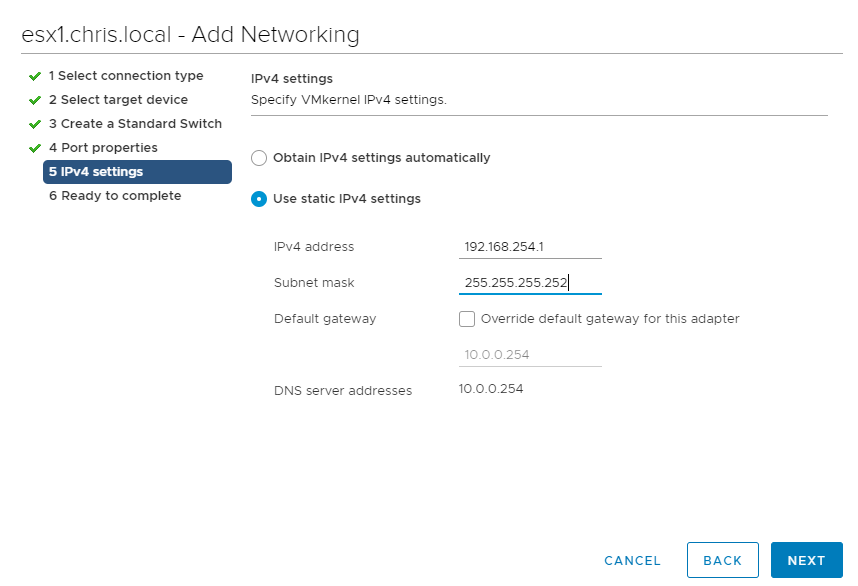
This is how the networking now looks on my first host. I now need to repeat the process on the second host, ensuring to use a different IP address of course! It’s worth noting that I’m using a /30 network for the directly attached hosts as this gives 2 usable IP addresses, which for directly attached hosts is perfect. This network doesn’t need to be and shouldn’t be routable on the normal network. All that matters is that the hosts can communicate between themselves.

While we are looking at host networking, it’s a good time to change vSwitch 0 and vmk0 to use an MTU of 9000. I will cover why later on, but it’s really important to ensure it is set correctly. If your physical network won’t support it, 1500 will work but you will have alarms on the vSAN cluster.
Before progressing further, we should do some vmkping tests to ensure that we have the full 9000 MTU between the two new vmk interfaces. Enable SSH for the hosts in Configure, Services, SSH and start it. Issue the following command, changing the IP address as appropriate.
[root@esx1:~] vmkping -d -s 8972 192.168.254.2
PING 192.168.254.2 (192.168.254.2): 8972 data bytes
8980 bytes from 192.168.254.2: icmp_seq=0 ttl=64 time=0.414 ms
8980 bytes from 192.168.254.2: icmp_seq=1 ttl=64 time=0.335 ms
8980 bytes from 192.168.254.2: icmp_seq=2 ttl=64 time=0.462 ms

--- 192.168.254.2 ping statistics ---
3 packets transmitted, 3 packets received, 0% packet loss
round-trip min/avg/max = 0.335/0.404/0.462 ms
The reason I am using 8972 instead of 9000 is that there is a 28 byte header to consider, 8 for ICMP and 20 for IP. Now that I have the networking on the hosts set up correctly for host to host communication over the directly attached cable, it’s time to test it with a vMotion. If everything has been done correctly it should work just fine, in my case it does.
The next step is to deploy the vSAN Witness Appliance. In my lab I added my NUC with ESXi on to vCenter for easier management, but it is not essential. Once the Witness has been deployed from the OVF template add it to vCenter and treat it like any other host. The only thing to bear in mind is that it should not be in the vSAN cluster, it should be an independent host. You’ll notice that when you add it, it comes with its own license.
Out of the box it comes with two vmnic’s, two standard vSwitches and two vmkernel Port groups – the first for management and the second for witness traffic. Since this is a homelab, I don’t need two and I am happy to run a single vmk for both duties. If you want to do this then remove the vSAN service from the second vmk, then remove the vmk and finally the switch. Don’t try and remove the switch or vmk without removing the vSAN tag as it doesn’t work and will take a while to time out.
Since the directly attached 10Gb connection is not routable anywhere else but between the vSAN nodes, we need to use the management vmk on the these nodes to allow vSAN to talk to the witness appliance and vice versa. We do this via command line:
esxcli vsan network ip add -i vmk0 -T=witnessThe vmk# may be different for you, so change appropriately. This needs to be done on both. To look at vSAN networking on the hosts we use esxcli vsan network list, which on my vSAN nodes now looks like:
esxcli vsan network list
Interface
   VmkNic Name: vmk1
   IP Protocol: IP
   Interface UUID: 0310435c-4c4f-e907-73f1-ac1f6b6565e8
   Agent Group Multicast Address: 224.2.3.4
   Agent Group IPv6 Multicast Address: ff19::2:3:4
   Agent Group Multicast Port: 23451
   Master Group Multicast Address: 224.1.2.3
   Master Group IPv6 Multicast Address: ff19::1:2:3
   Master Group Multicast Port: 12345
   Host Unicast Channel Bound Port: 12321
   Multicast TTL: 5
   Traffic Type: vsan

Interface
   VmkNic Name: vmk0
   IP Protocol: IP
   Interface UUID: ed18435c-90a4-d2b9-742a-ac1f6b6565e8
   Agent Group Multicast Address: 224.2.3.4
   Agent Group IPv6 Multicast Address: ff19::2:3:4
   Agent Group Multicast Port: 23451
   Master Group Multicast Address: 224.1.2.3
   Master Group IPv6 Multicast Address: ff19::1:2:3
   Master Group Multicast Port: 12345
   Host Unicast Channel Bound Port: 12321
   Multicast TTL: 5
   Traffic Type: witness
You can see that I have vmk0 which is used for management and vmk1 which is used for vSAN. I also have vmk0 tagged for witness traffic. You can only do this in command line at present.
We also need to enable witness traffic on vmk0 on the Witness Appliance, using the above method. After witness traffic is tagged, we can enable vSAN traffic using the GUI.
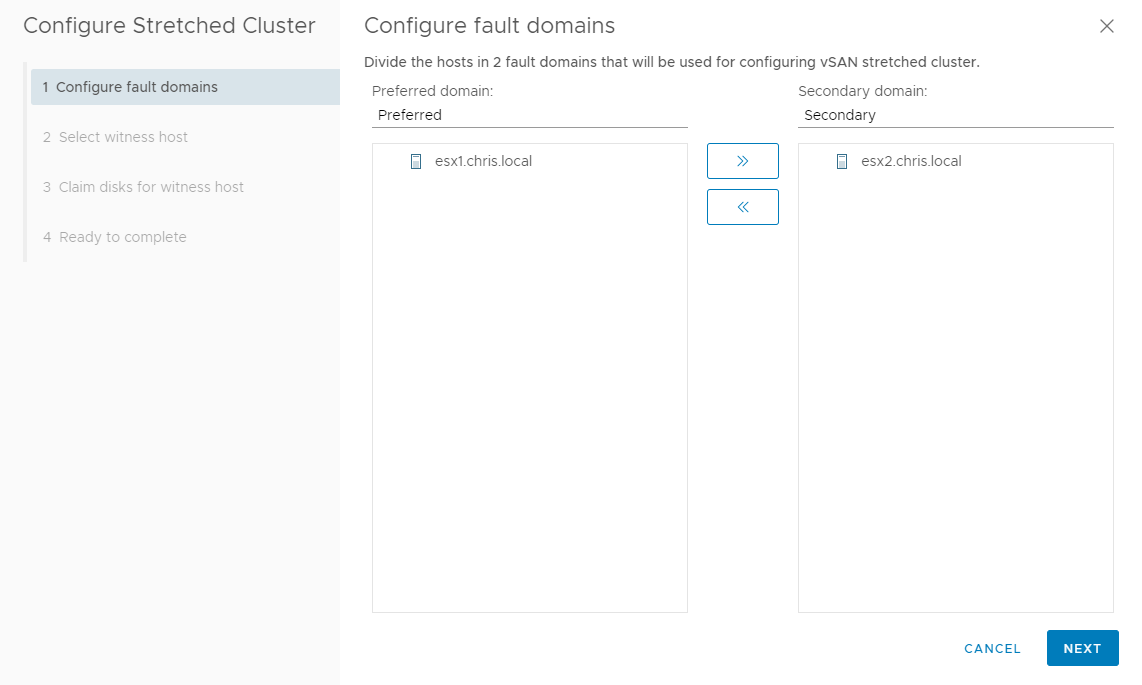
If everything has been done correctly, we can now finalise the vSAN configuration by creating a Stretched Cluster. Head to vSAN Cluster > Configure > Fault Domains under vSAN and Configure. Put one of the vSAN nodes as secondary and click next.
Now we select our witness host. If the networking has been set up correctly you should be able to continue. If it doesn’t succeed then review your networking.
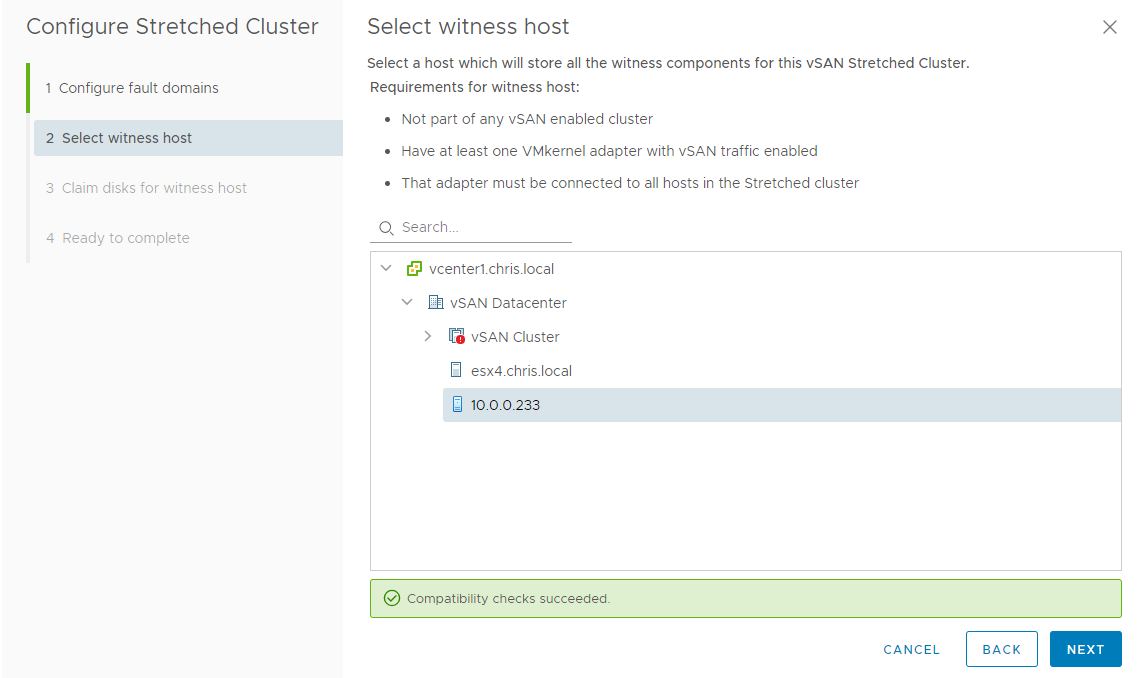
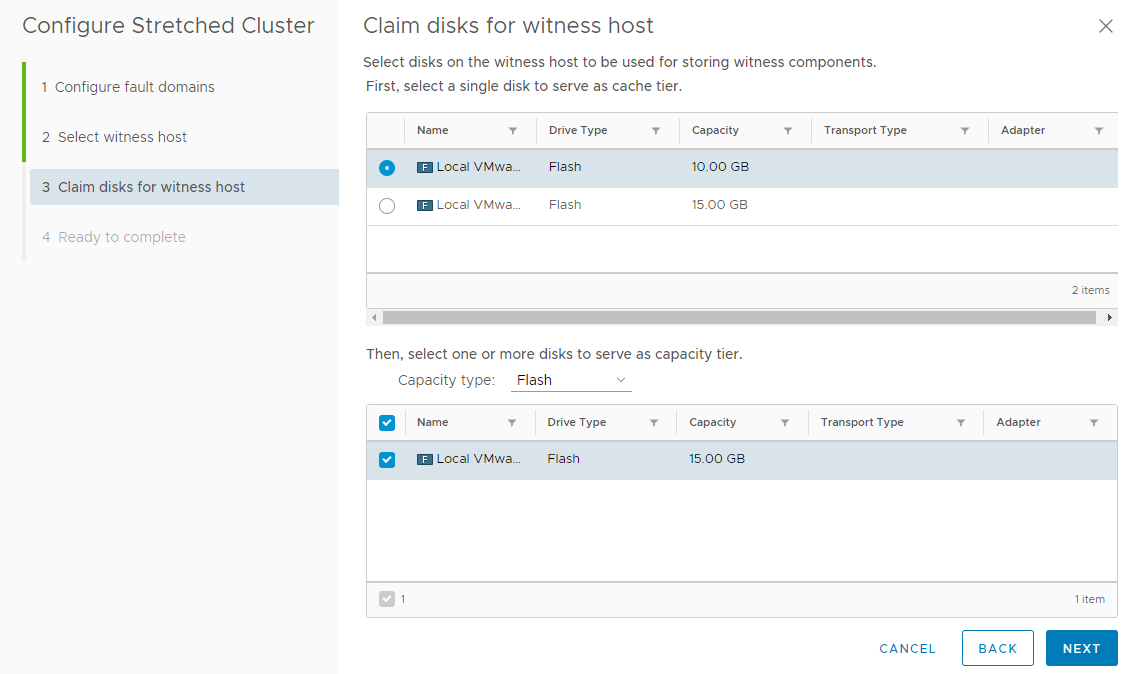
I am not sure why you have to manually select the disks for the capacity and caching tiers, I’d have though it would be able to do that automatically considering you can elsewhere when configuring vSAN.
On the summary screen press finish.
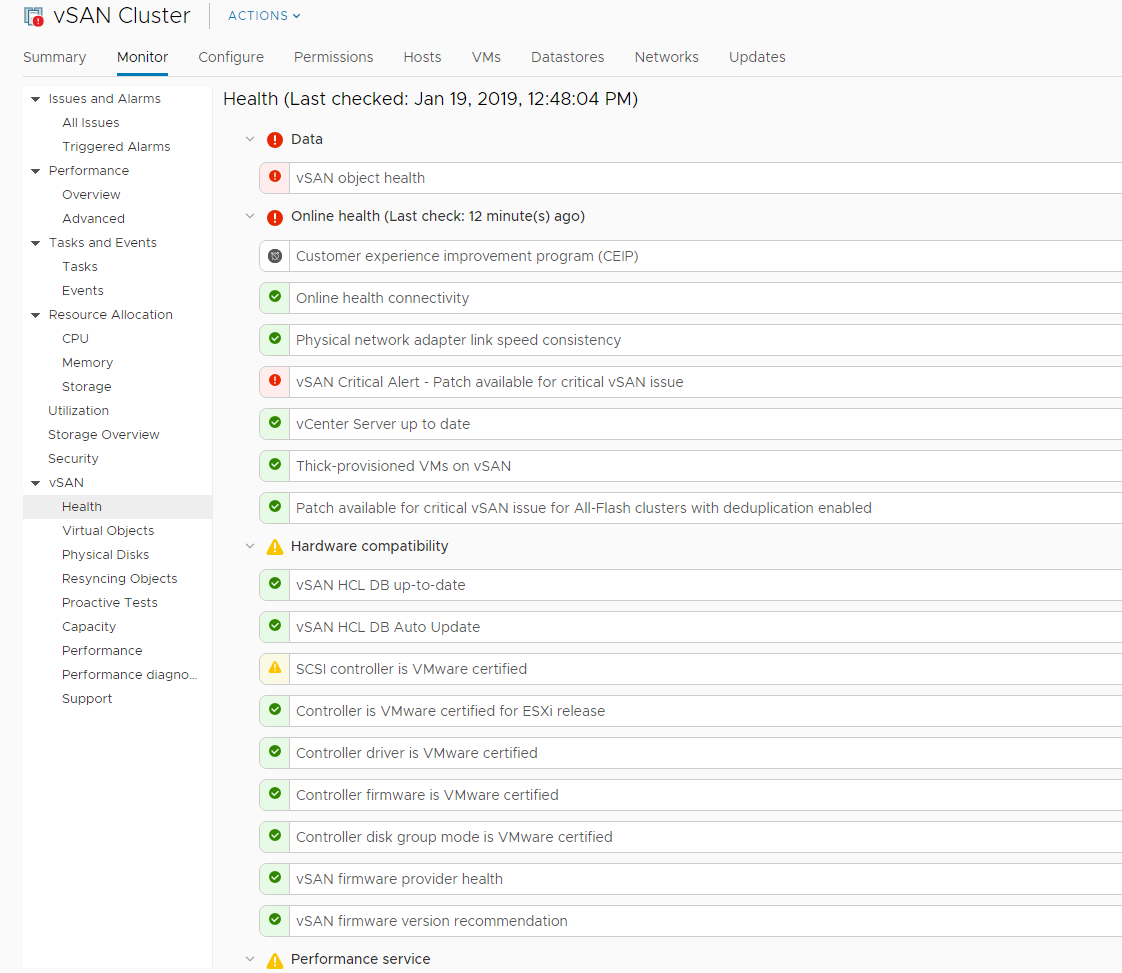
vSAN should now start replicating between both nodes and eventually all alarms relating to connectivity should disappear.
So there you have it, a 2 node vSAN cluster with Witness Appliance. Please feel free to ask any questions or leave feedback.